TTwitterBot2 - Twitter API v2 library for Delphi (Preliminary version)
TTwitterBot2 -DelphiのためのTwitter API v2ライブラリ(暫定版)

Last updated:


The statuses/filter endpoint in the Twitter API v1.1 was deprecated at March 14, 2023.
Developers must migrate now from Twitter API v1.1 to v2.
But we can't find the endpoint of Media/upload in the Twitter API v2.
If you want to post a tweet with a image file, you must authorize your Apps through the authenticatation of v1.1 and v2.

新しいTwitter API v2の仕様について
2023年4月29日までにv2に移行するようTwitter側から要求されているわけですが、2023年04月26日現在、Twitter側の準備が整っていないようで、 v2ではツイートの投稿は可能ですが、画像のアップロードができません。
したがって、画像アップロードの部分はv1を利用します。
このため、v1とv2の両バージョンのアプリ連携認証を行なう、という面倒なことになっています。


1. Download the TTwitterBot2 class for Delphi

Twitter API v2 authenticatation.png
API v2 authenticatation

Twitter API v2 Rate Limit
Rate limit
Download the source code of Delphi and a Demo app (Win64/Win32)

Delphi用ソースコードおよびデモアプリ (Win64/Win32) をダウンロード

Version 5
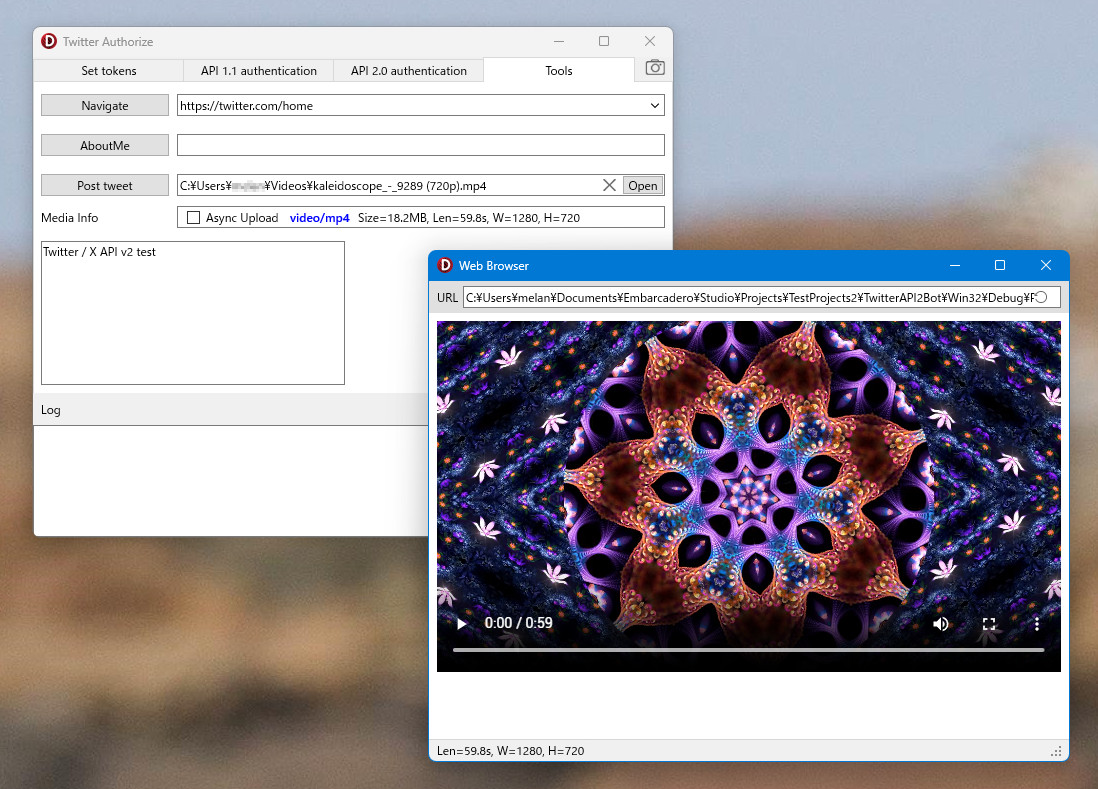
  • supports async chunked upload
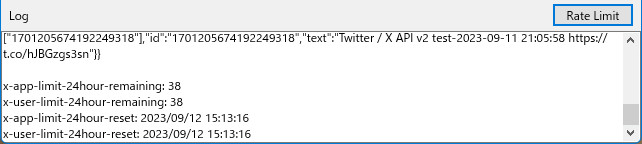
    You can upload larger video files async and simultaneously
  • Can check current API rate limitations
  • v4: use THttpClient instead of TIdHTTP (Indy) NEW
  • v4: Bug fix of WebBrowser
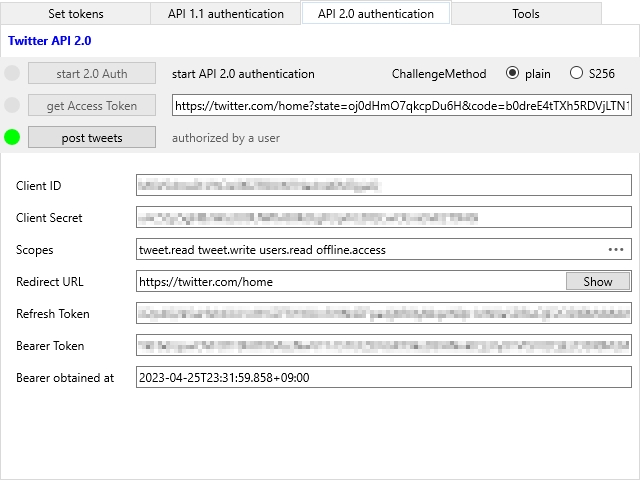
  • v4: Bug fix of API v2 Authorization steps
  • v5: Bug Fix of API v1 Media upload


Version 5
  • 非同期分割アップロードをサポート
    比較的大きいビデオファイルを非同期かつ同時に分割アップロードできます。
  • レート制限の確認機能を追加
  • v4: TIdHTTP (Indy) から THttpClient に変更 NEW
  • v4: WebBrowserの不具合修正
  • v4: API v2 認証ステップの不具合修正
  • v5: API v1 画像アップロードの不具合修正


2. Create your App in the Twitter Developer Portal

Twitter Developer Portal
  1. Start a Web Browser and access Twitter Developer Portal.

  2. Click at the bottom left.


  1. ウェブブラウザを立ち上げ、Twitter Developer Portal にアクセスします。
    なお、現状では英語のページしかありません。
  2. 左下の Free の下にある をクリックします。

有料版へ誘導しようとしますから、必ず無料版 FREE を選択してください。


3. User authentication settings

Twitter User authentication settings
The default value of the app is Read-only. You won't be able to post Tweets with this.
Change to Read-Write in this setting screen.

Important
A screen to copy keys and tokens is displayed before this setting screen, and what is copied at that time is only read-only, and changing it here will not be a read-write.

  1. Check Read and write under the App permissions caption.

  2. Check Web App, Automated or Bot under the Type of App caption.

  3. Under App info caption, type "https://twitter.com/home" in the Callback URI / Redirect URL and Website URL input boxes.

  4. Click the button.


アプリの初期値はRead-onlyなっています。これではツイートは投稿できません。
この設定画面でRead-Writeに変更します、

重要
この設定画面の前にキーやトークンをコピーする画面が表示され、その時点でコピーしたものは、あくまでもRead-onlyであり、ここで変更しても、Read-writeにはなりません。

この設定画面で設定を済ませておき、次のステップで開発者用の各種キーおよびトークンをデモアプリ側にコピー&ペーストします


  1. App permissions(アプリ許可)のRead and writeをチェックします。
  2. Type of App(アプリのタイプ)のWeb App, Automated or Botをチェックします。
  3. App info(アプリ情報)のCallback URI / Redirect URLおよび Website URLにそれぞれ https://twitter.com/home と入力します。

  4. をクリックします。


Your Project and App

Twitter API Project and App In Twitter API FREE tier, you can create only one Project and one App for API v2.

Give them descriptive names.

無料のFREEでのTwitter開発者登録では、1つのプロジェクトと、そのプロジェクト内に1つのv2用アプリが作成できます。
なお、プロジェクトおよびアプリには任意の名前を付けることができます。
ここでは、基本的に作成したアプリに対する設定を行ないます。


4. Authorize your App

Twitter API Keys and tokens

EqMax Twitter Authrize
Click the [Set tokens] tab in the Demo app.

[Set tokens]タブで、一括して各種キーおよびトークンを入力します。


5. Copy and Paste Keys and tokens

Confirm before regenerate keys and tokens

Regenerate keys and tokens

EqMax Twitter Authrize
In [Keys and tokens] screen, and
  1. Consumer keys
    and
  2. Client ID
then them in the Demo app.
After you paste all of them, click a button in the Demo app.


[Keys and tokens]画面で、
  1. Consumer keys
    および
  2. Client ID
(再生成)と を行ない、 デモアプリの[Set Tokens]タブの対応する項目に「ペースト」します。


すべてをペーストした後、 ボタンをクリックして、v1ならびにv2のアプリ連携認証を行ないます。


6. Twitter API v1 authentification

Twitter API v1 authorize

Twitter API v1 authorize

Twitter API v1 authorize

Twitter API v1 authorize
procedure TTwitterBot2.Authorize_v1;
procedure TTwitterBot2.GetAccessToken_v1(Verifier: string);


To be able to upload a image from the BOT, start the v1 authentication.
  1. Click [API 1.1 authentication] tab.

  2. Click button.

  3. A Web Browser is displayed to authorize your app.

  4. If you grant your App, a PIN is displayed and copy it.

  5. Click a button

  6. Click a button.

  7. if a button is enabled, v1 Auth is successed.


BOTから画像ファイルをアップロードできるようにするために、API v1.1のTwitterアプリ認証を開始します。
  1. [API 1.1 authentication]タブをクリックし、API 1.1 authentication 画面を表示します。

  2. ボタンをクリックします。

  3. ブラウザ・ウィンドウが表示され、連携アプリの許可を求められます。

  4. 許可すると、PINが表示され、これを選択してコピーします。

  5. ボタンのをクリックしてPINをボックスにペーストします。

  6. ボタンをクリックします。

  7. ボックスが有効になったらv1 認証は成功です。


7. Twitter API v2 authentification

Twitter API v2 authorize

Twitter API v2 authorize

Twitter API v2 authorize

Twitter API v2 authorize

procedure TTwitterBot2.Authorize_v2;
procedure TTwitterBot2.GetAccessToken_v2(Url: string);


To post a text form your BOT, start the API 2.0 Authentication.

  1. Click a [API 2.0 Authentication] tab.

  2. Click a button.

  3. A Web Browser is displayed to authorize your app.

  4. If you grant your App, a CODE is pasted from the Browser URL.

  5. Click a button.

  6. if a button is enabled, v2 Auth is successed.


BOTからテキストを投稿できるようにするために、API v2のTwitterアプリ認証を開始します。

  1. [API 2.0 Authentication]タブをクリックし、Twitter API 2.0画面を表示します。

  2. ボタンをクリックします。

  3. ブラウザ・ウィンドウが表示され、連携アプリの許可を求められます。

  4. 許可すると、デモアプリ側でトークンを取得するためのCodeが自動的にペーストされています。

  5. ボタンをクリックします。

  6. ボックスが有効になったらv2 認証は成功です。


8. Post tweet with image

Twitter API v2 Post test tweets

Twitter API v2 Post test tweets

Twitter API v2 Post test tweets with Video
Post test tweets with Video

Twitter API v2 Post test tweets with Video
function TTwitterBot2.DoUploadImage_v1(Filename: string): string;
function TTwitterBot2.DoRefreshTokens_v2: string;
function TTwitterBot2.DoPostTweet_v2(Text: string; MediaID: string): string;


After your App is authorized, try to post a tweet with a image.
  1. Clikc [Tools] tab.

  2. Click a button to select a image file.

  3. Type a text in a memo box to post.

  4. Click a button.

Hint

An access token / bearer token lifetime is 7200 seconds. Before you use an access token, check whether it is valid.
If it is not valid, you must obtain a new access token with a refresh token.
At this refreshing process, you get an new access token and a refresh token that you can use at the next refreshing process.


v1およびv2のアプリ連携認証が終わったら、いちどテストとして画像付きツイートを投稿してみましょう。
  1. [ツール]タブをクリックし、ツール画面を表示します。

  2. 右端にある ボタンをクリックし、投稿する画像を選択します。

  3. 投稿ボックスに適当なツイート文を入力します。

  4. ボタンをクリックします。

  5. 投稿を確認するために、 ボタンをクリックします。

  6. ブラウザで[プロフィール]をクリックすると、先ほど投稿したツイートが最上位に表示されるはずです。

ヒント

access token / bearer token の寿命は7200秒です。access tokenを使用する前に期限が切れてないかどうかチェックする必要があります。
期限切れであれば、refresh token を使って新しい access token を取得します。
このトークン更新プロセスでは、新しい access token および refresh token を取得できます。この refresh token は次回のトークン更新プロセスで使用します。


2023-10-16

If you create an Animated Gif File with the VCL TGifImage component, an error can occur in Twitter API.
Try use TAnimatedGifClass in a file GifAnalyzeClassUnit.pas.

USAGE

  • First load Gif file: TAnimatedGifClass.LoadData(Filename: string);
  • Then save Gif file: TAnimatedGifClass.SaveData(Filename: string);
  • All unnecessary parts will be removed.


  • VCL TGifImageコンポーネントを使ってGifアニメを作成すると、Twitterにアップロードするときエラーが発生することがあります。
    GifAnalyzeClassUnit.pasファイル内のTAnimatedGifClassを使うとアップロードに成功することがあります。

    使い方

  • まずTAnimatedGifClass.LoadData(Filename: string)でGifファイルを読み込みます。
  • つぎにTAnimatedGifClass.SaveData(Filename: string)でファイルに保存します。
  • 不要な部分がすべて除去されます。


  • StackOverflow

    The animation is restarted prematurely


    tegami ofni.noinalem@inimqe